Rottweilers Ate My Laptop

Rottweilers. Computers. Cameras. World Domination. Not necessarily in that order.

Rottweilers.
Computers. Cameras.
World Domination.
Not necessarily in that order.

  • Tumblr
  • Twitter

Powered by Genesis

  • Home
  • About
  • Rottweilers
  • NaBloPoMo
  • Contact

AdobeGenPro Digital Imaging Workshop: Digital Anachronism

November 23, 2013 by kathi

Our assignment this week was to create a “digital anachronism”: a composite image combining elements from two different time periods. I decided to put a typist and typewriter in the midst of a group of computer users.

digital_anachronism_kwilson

Students_taking_computerized_exam
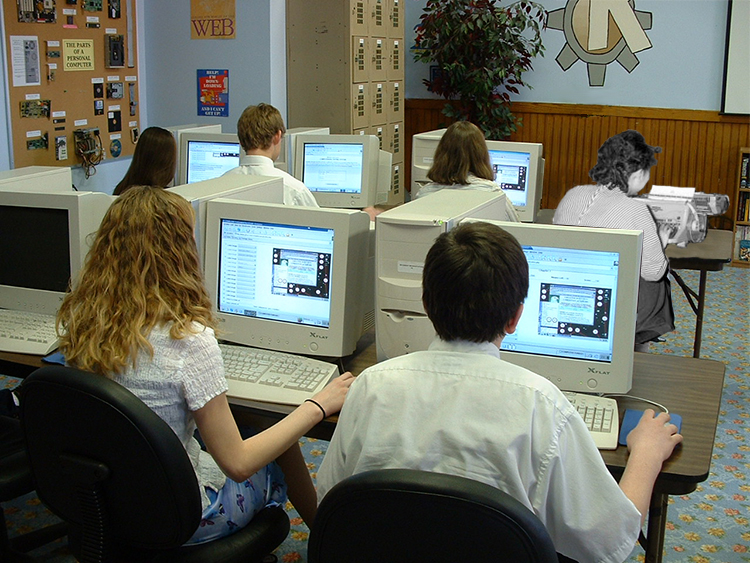
Base photo: The base photo shows a group of students taking a computerized exam in 2001. I was hoping for something newer, but even though this was barely into the 21st century, it had an appropriate Creative Commons license and at least one of the pictured people was in the correct position for my purposes.


Typistes_op_het_ministerie_van_Sociale_Zaken_in_Den_Haag._-_SFA001004393Insert photo: The insert photo shows a group of typists at the Ministry of Social Affairs and Employment of the Netherlands. I’m not sure what year it was taken, but it’s available only in black and white and all of the typewriters are manual.


firstdraft
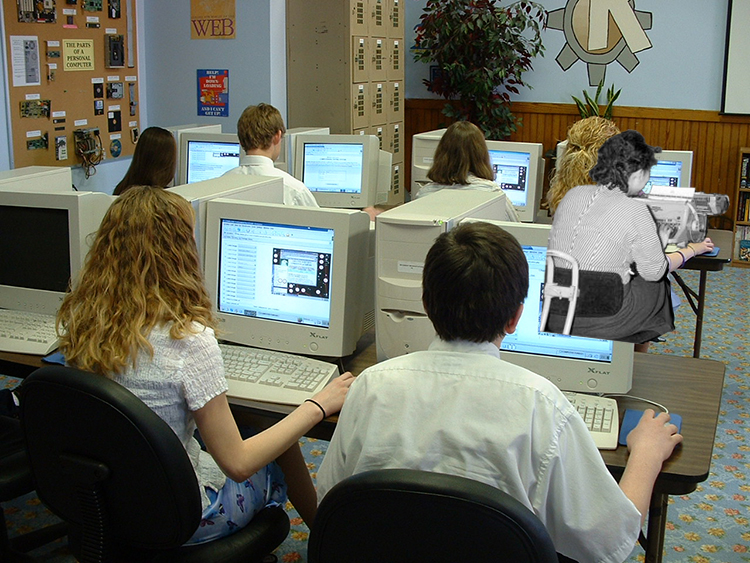
I decided to replace the top right computer student with the lower left typist. First, I resized the larger base photo to the same width as the insert photo. Next, I selected the lower left typist and her typewriter and pasted her into a separate layer. I used Free Transform to scale her down and rotate her slightly clockwise. Now to remove the computer student and her computer, reconstruct the wood panel background, and paste the lower right computer student in place over the inserted typist.

toplayer
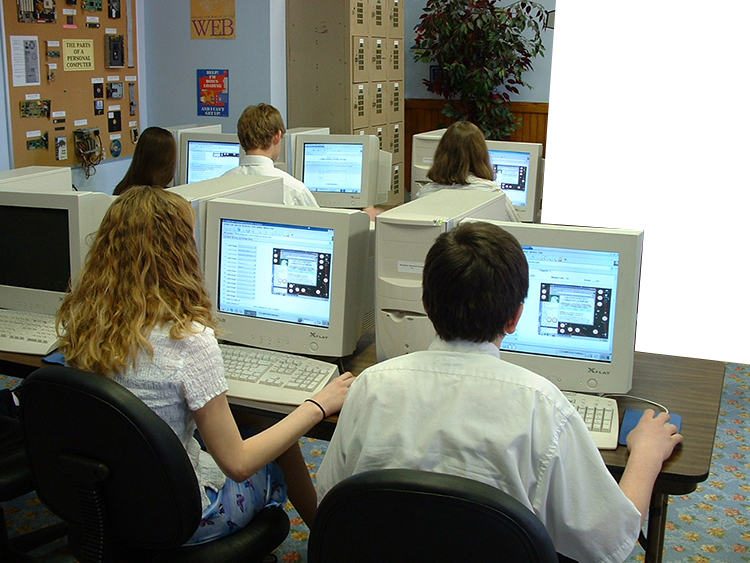
I took the quickest way possible to prepare the top layer by using the Polygonal Lasso Tool and selecting the entire top right hand corner of the photo for deletion.


wood
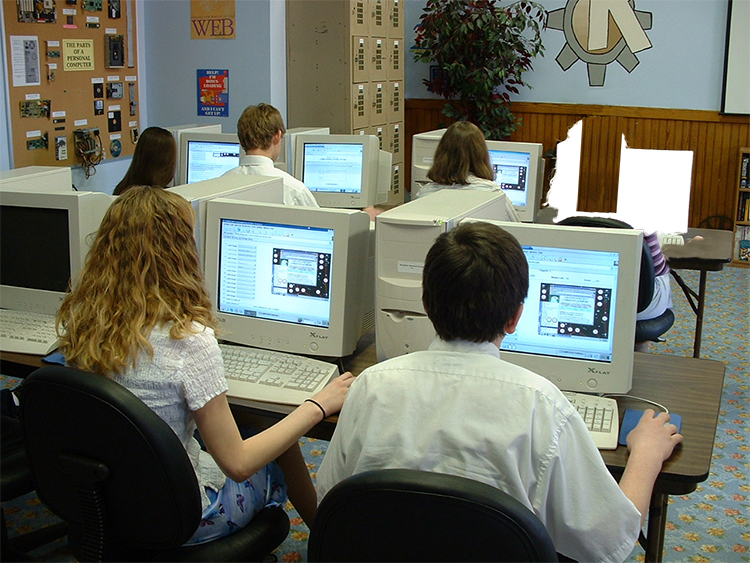
I used various selection tools, Clone Stamp tool, and Smudge tool to remove the computer student, her computer, the plant, and create some wood paneling from the existing background. Since this would be covered up by the typist, I did not dwell on the details. I left the original computer student’s leg in the photo, but converted it to greyscale to match the typist. I also had to paint over a fragment of the computer student’s blue skirt by cloning the carpet.

I was not ambitious enough to switch out another typist. It would have been quite a challenge to replace either of the foreground computer students due to the background that would need to be fabricated.

(Base photo credit: By Michael Surran (Students taking a computerized exam) [CC-BY-SA-2.0 (http://creativecommons.org/licenses/by-sa/2.0)], via Wikimedia Commons / Insert photo credit: Collectie SPAARNESTAD PHOTO/Wilko A.G.M. Bergmans [CC-BY-SA-3.0-nl (http://creativecommons.org/licenses/by-sa/3.0/nl/deed.en)], via Wikimedia Commons)

Filed Under: Computers and Technology Tagged With: AdobeGenPro, digital anachronism, Photoshop

AdobeGenPro Digital Creativity Workshop: Premiere Pro

November 14, 2013 by kathi

This week, our challenge was to create a 30-second video.

The Premiere Pro assignment

Creative Challenge – 30-second book trailer: Create a short video sequence or trailer promoting your favourite book from the entire world of literature. Create a sequence that creatively highlights the key characteristics of the book in video format.

American Gods by Neil Gaiman is one of my favorite books of all time. It’s not an easy book to describe in 30 seconds or even 30 minutes (here’s Wikipedia’s attempt as background for those who have not read it).

I didn’t do any formal storyboarding for this project. I picked a few favorite quotes from the book to use for the voiceover and then picked some visuals that matched up with the quotes.

I found Premiere Pro somewhat overwhelming to use, but I was determined to learn at least a few basics and not run back to my iMovie comfort zone.

I opted not to add credits/notes to the video in order to use all 30 seconds for content. Here are the free resources I used to create my trailer.

  • Free royalty-free background loops from http://movietools.info (“Flight through the Clouds” and “Digital Rain”)
  • Free royalty-free images from stock.xchng (linder6580: 1279418 “Shadow” for the opening, cabrantes: 1121637 “Single Tree” for the closing)
  • Public domain images of the “old gods” from Wikimedia Commons
  • Background music is a free Apple GarageBand royalty-free loop, “Dogma”
  • Voiceover recorded with Recordium on iPad

I used Photoshop to resize and clone additional background for the opening and closing images, and convert the public domain images of the “old gods” to transparent images that could be superimposed over the clouds background loop.

I enjoyed creating the trailer even though I struggled with the time constraint. Perhaps I should have picked another favorite book with simpler themes! I’ve thought about professional and hobbyist applications for video, and there are many instances when video would be most appropriate for instructional materials. However, I still find it frustrating when a video is not accompanied by supporting text or static graphic resources. There are times when sitting through an entire video isn’t the best way to learn something.

Filed Under: Computers and Technology Tagged With: AdobeGenPro, American Gods, Premiere Pro

AdobeGenPro Digital Creativity Workshop: Flash Professional

November 14, 2013 by kathi

This week, our challenge was to create a short frame by frame animation.

The Flash Professional assignment

Creative Challenge – Walk Cycle: Using Adobe Flash Professional create a short walk cycle of a drawn character using the frame by frame technique described in the live class.

I’ve used Flash before for creating some very basic text animations, and I’ve also modified an existing Flash photo gallery. None of these projects involved any drawing, so this was a mostly new experience to me.

We were given some excellent walk cycle resources in the class, including this great tutorial from idleworm.com. I thought that a dog obedience recall exercise would give me the movements I wanted to include:

  • Sit Axel next to me and ask him to stay.
  • Walk away from him for several paces—this would give me a 2-legged walk cycle.
  • Turn towards Axel and call him to me—this would give me a 4-legged walk cycle.

My process:

  1. Video the recall exercise. I used the video function of my Nikon Coolpix S51 point and shoot camera. Once again, I had no one to help me film, so I set up the camera on a mini tripod and kept it running for several takes of the recall exercise. I ended up with about six minutes of raw footage.
  2. Trim the video down to one recall exercise, which was about 10 seconds of footage.
    http://rottweilers.brilliant-disguise.net/wp-content/uploads/2013/11/anim01_1.mp4
  3. Import the video into Photoshop, using Import Video Frames to Layers. This is where I learned that I should have used an HD video camera and got closer to the action. Cropping in on the action resulted in an image that was low resolution and more difficult to trace in Flash. Live and learn, and next time, start filming earlier in the day so a reshoot is possible before it gets too dark! This is where I trimmed down the number of frames and tried to pick the ones that would correspond best to the walk cycles. The 4-legged walk cycle didn’t work that well because a dog will run or gallop on a recall rather than walk, and I really didn’t get all of the best frames.
  4. Export the frames as an image sequence from Photoshop. Import to stage in Flash and trace over me and dog in each frame with paint brush tool. This would have been easier with higher resolution images to trace. Since I am somewhat drawing challenged, I was fortunate to have a Wacom Graphire tablet instead of having to struggle with tracing with a mouse. I was able to reuse sitting Axel and standing me across several frames. In addition to the class resources, I found this tutorial from Ripper Designs and Multimedia to be very helpful. I realized too late that I had no idea how to fill in the shapes I’d created (because they aren’t really closed shapes when drawn with the paint brush) so I could not use the background I’d originally planned. I settled for spray brushing some different greens at the bottom of the stage so it wouldn’t look so bare.

I ended up with six seconds of video, and I’m guessing that over an hour of work went into each second. I did enjoy creating this project and I’d like to do others in the future. For professional or hobbyist uses, I can think of many instances where an animated video sequence would be very effective to illustrate a step-by-step procedure. My drawing skills will need some improvement first, though!

Filed Under: Computers and Technology Tagged With: AdobeGenPro, Axel, Flash Professional

AdobeGenPro Digital Creativity Workshop: Photoshop

November 14, 2013 by kathi

I’d like to go into a little more detail about thought processes and technical notes for each one of the Digital Creativity in the Classroom weekly projects.

The Photoshop assignment

dog
Finished product: Dog

Creative Challenge – Big and Small: You’ll need to take two images of yourself and relate them to one another – one a supersized (or normal) version of you, the other a normal (or super-small) version.

I’ve had a recurring nightmare over the years where I’ve switched sizes with one of my pets and I’m being hunted down. That was my inspiration for this project. While this did not exactly meet the assignment given because I did not use two versions of myself (or two versions of the same person, animal, or item), I still felt it related big and small in a way that was more personally inspiring to me.

cat
Finished product: Cat

I did not have a good location to stage a hunting scene with any of my pets, so I skipped straight to where I was already captured for the next meal. Somehow I also skipped right over the fact that it was neither easy nor kind to ask them to pose with a partially filled bowl of food and do nothing but look in. I was planning to do the scene with one of the dogs and hope their obedience training would get us through the photo shoot. I didn’t expect the photobombing cat, but I ended up using his portion of that photo.

DSCN0062There were no other humans around to help me with photos, so the photo of myself was taken using the 10-second timer on my point and shoot camera. Why is 10 seconds so long when you are trying to fill it in a speech class, and so short when you are trying to get from one side of the kitchen to the other without hurting yourself? This was an outtake as the version where I have both hands outstretched worked much better.

kwI used the Quick Selection tool and the Eraser tool with a Wacom Graphire tablet to do a quick ‘n’ dirty outline and clean it up a bit. I admit to not using best practices in production: I did not use a mask, duplicate layers, or other non-destructive techniques. In an actual production situation, I like to think I’d be more careful!

Putting it all together

(1)
(1)

Here is the photo I picked for the “dog” version (1).


(2)
(2)

I cropped it down and made it the bottom (background) layer of my file (2).


(3)
(3)

I placed the outlined photo of myself on the next layer, rotated it counterclockwise, and erased my feet (3).


(4)
(4)

The bottom of the bowl was showing through where my feet should have been, so I added some layers with a few pieces of kibble outlined and pasted onto each, like this one (4).


See above for the finished product as well as the “cat” version. Click on any of the photos to display a larger version.

One of my goals is to add more graphics to any appropriate instructional or informational materials I prepare. I am not sure how often I will need to use photo montages but I will watch for opportunities to do so.

Filed Under: Computers and Technology Tagged With: AdobeGenPro, Axel, Oliver, Photoshop

Has it been a whole year already?

November 14, 2013 by kathi

Yes, it has. Did you miss me? Don’t worry—you don’t have to answer that.

I considered reviving the blog for NaBloPoMo but decided to participate in something on LiveJournal instead (and I’m woefully behind on that). Doing NaNoWriMo is completely insane, but I’m still giving it a shot. The story behind that spark of insanity is on Tumblr, if you’re curious.

What finally brought me back here was Adobe Generation Professional’s Digital Creativity in the Classroom (I’ll give you more specifics about the blogging project in another post). This is a course for educators, so you might be wondering why I’m taking it since I am not currently an educator, nor do I have any past teaching experience.

What I do have is a long and mostly positive history with Adobe software, thanks to the many years I spent in the graphic arts, specifically prepress production. Since my particular area was typography and page layout, my expertise is with InDesign. I’m also familiar with Dreamweaver, and I’ve been criminally underutilizing Photoshop and Illustrator for many years. Despite this, I’d only just discovered the depth of the educational resources that Adobe provides in the way of paid and free content. I was searching through some of the free content on the Adobe Education Exchange in an effort to help a friend who wanted to learn InDesign, and stumbled across the Digital Creativity course.

Encouraged by the fact that apparently no one was going to force me to prove that I was an educator before I could sign up, and also by the fact there was no class fee, I signed up. My rationale was that we are all called upon to educate others at some time, no matter our job description, and that is how I introduced myself:

But these days, aren’t we all educators in some way or another? Working for a very small business, there is often a need to present information clearly to co-workers or clients, and I’m hoping this class will help me to get better at it.

cat
Big and Small: Photoshop project

I am so glad I took this course. It helped to bring out a creative spark that had been obscured by years of executing other people’s designs, rather than creating something of my own. The course was set up perfectly for my own personal situation. It started with a Photoshop project. Being able to work in a program I  was already pretty familiar with allowed me to concentrate on ideas, rather than worry about execution. I would need the feeling of success from the Photoshop project to carry me through the next two projects.

walk01c
Walk Cycle:
Flash project
Sequence 01.Still001
Book Trailer:
Premiere Pro project

My past experience with Flash was very minimal and not particularly positive, and I had no experience at all with Premiere Pro. I kept telling myself that the ideas were more important than the execution and I think I convinced myself by the time I completed these projects. I’m afraid I’m failing miserably at being “economical and efficient” with my time on this blogging projects, but those are the breaks!

So a few more observations on the course.

For the most part, the course structure was great. I was not able to attend all of the live classes, but the ones I attended were informative, made excellent use of guest speakers, and (very important) began and ended on time without shortchanging any of the topics that needed to be covered. One thing that would have been nice is a little more pre-course information and tutorials for the programs used. Photoshop, Flash, and Premiere all have pretty substantial learning curves, and I am sure it was not easy for first-time users of the programs. The Education Exchange, and other parts of Adobe’s site, have a ton of available resources, but a little nudge towards them would have been helpful.

Speaking of first-time users, I am so, so impressed with the participants who did not have any previous experience with the programs. Their first efforts were amazing, not only in creativity but in execution. That cannot have been easy.

As for me, I still hope to use what I’ve learned in this class to make any educational or informational presentations to co-workers and clients more interesting and more entertaining. I’m proficient at breaking down instructions into logical steps, but I haven’t utilized visuals often enough and I plan to change that.

Filed Under: Blogging and Social Media, Computers and Technology Tagged With: AdobeGenPro, Digital Creativity in the Classroom

  • 1
  • 2
  • 3
  • …
  • 19
  • Next Page »